
February is my month and I've decided to make quilts for my niece and nephew to give at Christmas next year.
I picked one of my favorite traditional blocks which I'm going to complete in two color sets, one for my niece and one for my nephew.
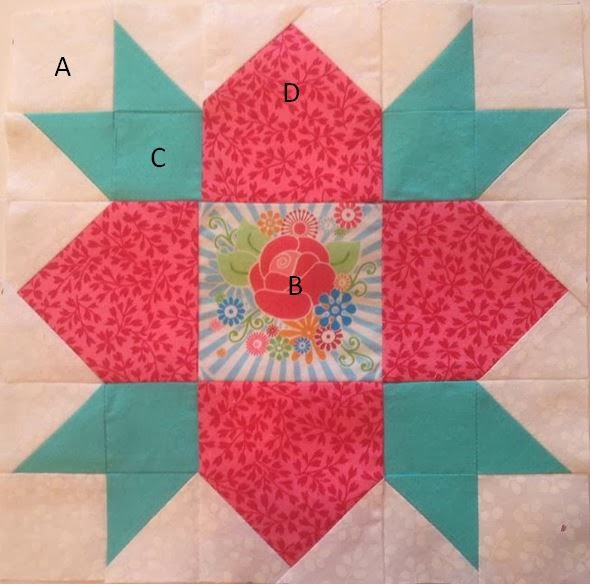
The block I have chosen is "weathervane" and I hope you will like it as much as I do!


![[FinishedWeathervaneBlock2.jpg]](https://blogger.googleusercontent.com/img/b/R29vZ2xl/AVvXsEhDrNPS563gucOJhbQzeaHFurysyix7Gs3nlrYA2bJr2CaKz0jdCFN7WKdAeMfaNM94gWLWc77XKkPVgUuV4JCOwsNVRziHL25KlAJcrWL2nlrKPvFB2aPF1CUaB_U1-I18IsRwxSL-0w4/s200/FinishedWeathervaneBlock2.jpg)
.jpg)
*Photo 1 (in top left) is for Lauren's quilt, the second photo is another one of mine from another project, the last three are borrowed from the internet.
Feel free to pick the color scheme that tickles your fancy and send me a block for either of these quilts!
Background Fabrics: White on white prints, low volume prints that read as white or cream, or solid white/cream if this is all your stash has are fine.
Landon's Quilt: Boy colors!! Please no obvious floral prints if possible, when choosing fabrics ask yourself if an 8 year old boy would think it was too girly. Blues, greens, yellows, reds, greys, etc.
Lauren's Quilt: Bright and modern. Floral prints, pinks, purples, greens, yellows, greys, etc.
General Note: Please no overly juvenile prints or batiks (not my favorite at all). I would like this quilts to last the kids a LONG time, so please avoid anything that they will grow out of in a few years such as character prints or children's fabrics.
For this block you will need four fabrics:
A) Background Fabric
B) Focus Fabric (fussy cuts or large prints work well here)
C) Coordinating Fabric
D) Contrasting Fabric
Cutting:
A) Background Fabric
2 - 4" squares
12 - 2" squares
B) Focus Fabric
1 - 3.5" square
C) Coordinating Fabric
2 - 4" squares
4 - 2" squares
D) Contrasting Fabric
4 - 3.5" squares
Step 1: Half Square Triangles (HSTs)
Take your 4 - 4" squares (A and C).
Sandwich one A and one C right sides together and stitch around all 4 sides.
Cut the sandwich into 4 triangle as shown below.

Press seams outward (vs. to one side or the other - this will help the small HSTs lay flat) and square up to 2"each.
Step 2: Corner Blocks
Take 2 of your HST, 1 - 2" A, and 1 - 2" C and assemble as follows, using a scant 1/4" seam, pressing seams towards the HSTs and then pressing the long seam - joining the 2 sets of 2 together - open.

Repeat this 4 times until you have assembled and pressed all of your block corners.
Step 3: Blades
You will need 1 3.5"D square and 2 2"A squares for each unit.
Mark your 2" squares with pencil or washable fabric marker diagonally. Sandwich one A square with the D square with your pencil line oriented across the corner (from the middle of one side to the middle of the other). Stitch the first corner along your pencil line, press away from the triangle, and trim seam allowance to approx. 1/4". Repeat this process with the second corner.

Step 4: Block Assembly
Assemble strips as follows, using scant 1/4" seams:
Strip 1: Corner-Blade-Corner, and press seams toward the blade.
Strip 2: Blade-Center-Blade, and press seams towards the blades (away from the center).
Strip 3: Corner-Blade-Corner, and press seams toward the blade.
Finally, sew your strips together with a scant 1/4" seam and press the long seams open.

And ta-da! You should have a completed 9.5" x 9.5" block.
If anything was unclear, please feel free to reference these other great tutorials, just make sure you are using the measurements from this one!!
No comments:
Post a Comment
Liked my post? Hated my post? Have something to add?
Let me know!